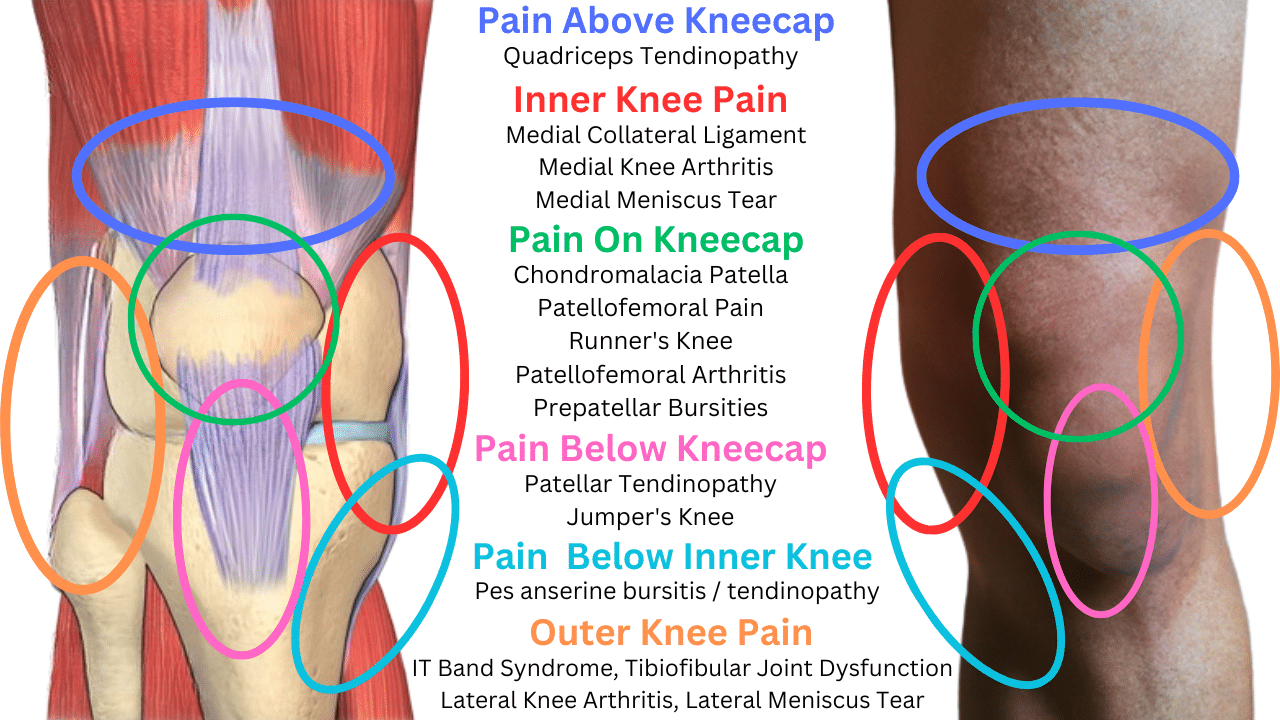
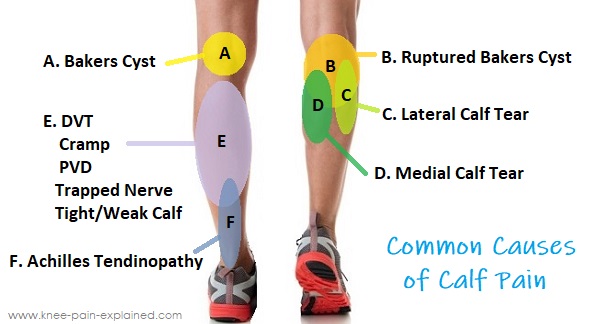
Location of pain charts and differential diagnosis
Anterior knee and calf:
Posterior knee and calf:
Basic knee examination
Inspection
Palpation
Temperature
Tenderness
Fluid
ROM
Special tests
Tendon x 1
Cartilages x 2
Cruciate ligaments x 2
Collateral ligaments x2
Iliotibial band x 1
Inspection
Observe both knees together. Note any asymmetry of the joint or quadriceps muscles.
Ask the patient to lie supine. Whenever possible, ensure the patient can lie comfortably with head back, legs straight, and toes up
Palpation
Assess temperature by placing the back of the hand to the shin then ipsilateral knee, repeated for both legs.
Commonly, the knee will feel cooler than the shin.
If the knee feels warmer than the shin, suspect inflammation.
Try the “crossover test” with one hand on one knee and one on the other knee. Decide if there’s a temperature difference. Next, cross the hands to test the opposite knee. If there’s a temperature difference, it will be exaggerated by this maneuver.
Assess for fluid
Method 1: Gently press just the medial of the patella, then move the hand in an ascending motion. Then press firmly on the lateral aspect of the knee.
Commonly, no fluid will be appreciated.
A medial aspect that ‘bulges’ out after lateral pressure (positive “bulge sign”) is consistent with a moderate amount of fluid.
A medial aspect that does not bulge but tensely reflects lateral pressure is consistent with a large amount of fluid.
Method 2: Assess for fluid by placing one hand superior to the patella and with slight downward pressure milk the suprapatellar pouch which empties into the knee joint. Next, use the other hand to push on the patella. If there is an effusion, the patellar will bounce off the underlying bone (patella tap test).
A palpated or audible tap indicates a “ballotable” knee and is consistent with at least a moderate amount of fluid.
Tenderness
Range of Motion
Special maneuvers
Assess for tendon pathology by firmly palpating the superior pole of the patella and then the inferior to assess patellar femoral syndrome.
Tenderness at the superior insertion is consistent with quadriceps tendon pathology.
Tenderness at the inferior insertion is consistent with patellar tendonitis, “Jumper’s knee.”
In the patient with direct patellar trauma & isolated patellar tenderness, an x-ray is indicated to evaluate for fracture.
Tenderness at the tibial tuberosity in young patients may indicate Osagood-Schaltter disease. Osgood-Schlatter disease is a common cause of knee pain in growing adolescents. It is an inflammation of the area just below the knee where the tendon from the kneecap (patellar tendon) attaches to the shinbone (tibia).
Assess for cartilage pathology
Apley’s grind test (patellar cartilage tear): By placing the palm on the patella and applying firm pressure while manipulating the patella in the sagittal plane. Crepitus is significant only when accompanied by tenderness, in which case it is consistent with patellar cartilage pathology.
McMurray test (meniscus cartilage tear):
Lateral meniscus tear: With the patient supine, fully flex the knee, place forefingers on the lateral side of the joint line, then with applying valgus stress and internal rotation of the leg, extend the knee looking for both pop/click and pain
Medial meniscus tear: With the patient supine, fully flex the knee, place forefingers on the medial side of the joint line, then with applying varus stress and external rotation of the leg, extend the knee looking for both pop/click and pain
Assess for laxity (of the cruciate ligaments)
While supine, ask the patient to flex the knee and set foot on the examination table. Sit on the foot to immobilize it and grasp the head of the tibia with both hands and pull anteriorly.
Movement greater than 1cm (positive anterior drawer sign) is consistent with an anterior cruciate ligament (ACL) tear. Do not attempt to elicit an anterior drawer sign with legs hanging; the extra degree of freedom will confound any findings.
Lachman test: flex the knee only 20-30 degrees (rather than 90 degrees in the anterior drawer sign), then attempt to pull the tibia anterior relative to the femur. If positive, a deficient ACL will demonstrate increase movement forward. This test is thought to be more sensitive than the anterior drawer sign.
Attempt to hyperextend the knee by placing one hand superior to the patella and the other posterior to the heel. More than 2-3cm (i.e. able to place one or two fingers beneath the heel when leg is extended and flat) is abnormal.
With both hands, flex and extend the knee. Repeat while introducing medial and lateral rotation. Determine if any “locking” or “catching” is present.
Collateral ligaments – With the leg straight, apply valgus stress and varus stress to text deviation greater than a few centimeters.
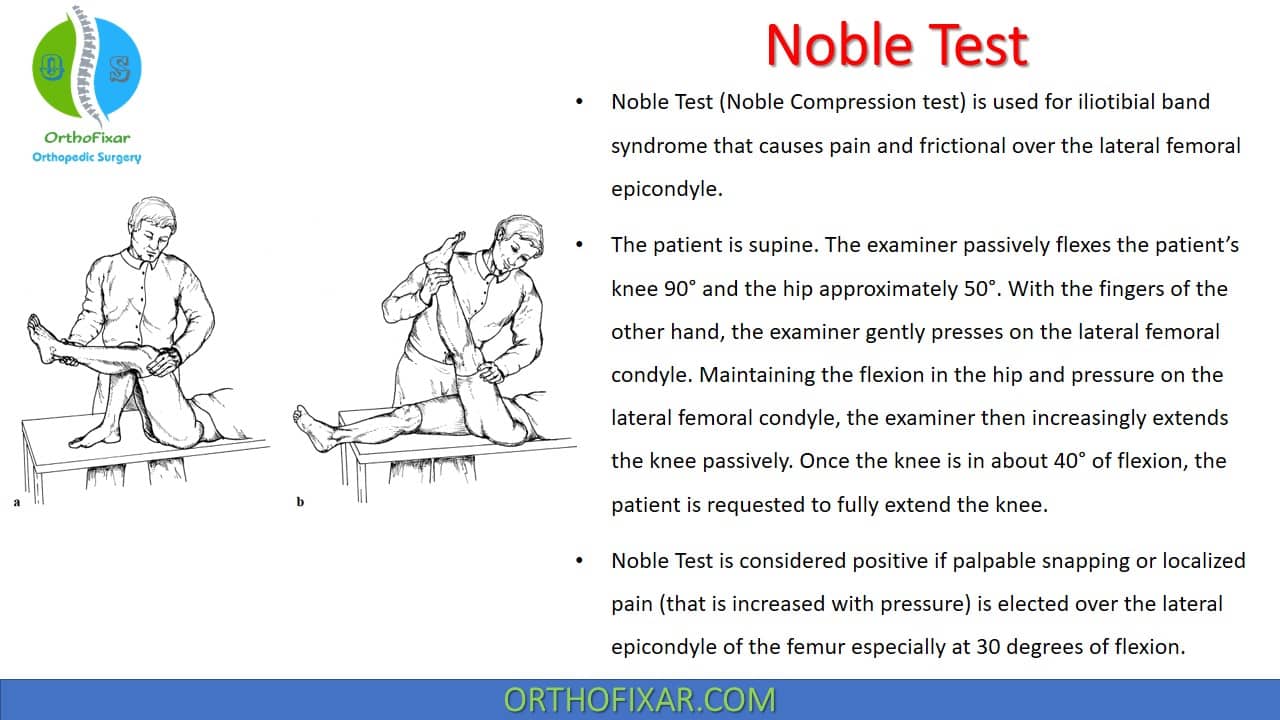
Iliotibial band syndrome
Iliotibial band syndrome presents as lateral knee pain from a tight iliotibial band that crosses over the lateral femoral epicondyle. It is most commonly seen in runners and aggravated during running. The diagnosis can be made by noting pain in the lateral aspect of the knee, especially during running. There are also two tests, reviewed below that will help you diagnose and confirm iliotibial band syndrome.
Treatment includes rest, and pain medications and often can be corrected by addressing strength deficits such as abduction weaknesses which can be treated with physical therapy.
The noble test is done by placing the knee with some flexion while the patient is supine. Next place the thumb over the iliotibial band before its insertion into the lateral femoral condyle (as noted in the image). While placing pressure with your thumb, attempt to extend the leg, looking for pain under your thumb.
In the Ober test, you are looking for a tight iliotibial band. To conduct the Ober test, place your patient on his or her lateral side with the painful side facing up. Next, place your hand under the lower part of the leg and bring the whole leg posterior (as in the image below). Next, while stabilizing the hip, attempt to bring the leg down to the level of the other leg. The inability to bring the leg down to the level of the lower leg suggests a tight iliotibial band and a positive Ober’s test. A positive Ober’s test in a patient with lateral knee pain is highly suggestive of iliotibial band syndrome.